In colder climes, where I live, it is prudent to cover the garden beds in order to warm up the soil and get tender plants out early. Later in the season (about mid-August) it is necessary sometimes to cover the bed in order to prevent frost damage! 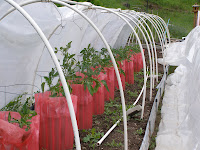 The picture above is one taken of Marshall Bean's garden, from whom I got this idea. He does his a bit differently than I, but the picture shows the framework with the tomatoes pretty well. Below is a picture of my garden with the 24-inch pathways and the 30-inch beds. It is late July, and the tomato plants look vigorous. The framework is tall enough for my 4-foot tomato cages.
 My dear husband cut rebar to 24-inch lengths for me. I pounded 12 inches of each piece into the ground along the edges of all the beds at 30-inch intervals. Then I placed a 9-foot piece of pvc pipe on one piece of rebar and bent it over the bed to the other side and onto the other piece of rebar. You can see in the picture above that the bed on the left has 1-foot pieces of pvc over the rebar that isn't used for the pavillion. This is done on all beds so that I, and my visitors, don't injure or impale ourselves on the exposed pieces of rebar.
I make my garden beds about 30 inches wide (because I'm not 5' tall yet) with 24 inch paths between . I lift out 8-12 inches of dirt from the path to put on the bed, raising it some. Then I fill in the path with deep layers of straw. When it rains in the spring I can still walk out in the garden and plant early greens and flowers due to the deep straw pathways. We have sticky, impenetrable clay soil which does not absorb water well.
Each bed is about 20 feet long, and I use electician's tape to attach a twenty-foot piece along the top to tie it all together. And then I covered the framework with heavy plastic for the pavillion.
Pvc pipe comes in 20-foot lengths, so I cut 1 foot off each end and used those to cover the rebar on the beds which don't have the pavillion over them. Over the squash beds I have a shorter framework using 6-foot lengths of larger, more pliable black pvc pipe. These are merely to get the squash started early in the season. Later they sprawl outside the framework, so I cover them with inexpensive sheets and bedspreads from the thrift store. This keeps the frost off until about 25 degrees, which it was this year in late September.


 Even in this close-up there is not enough information to make a certain identification. Nevertheless, it was a unusual and exciting site to see. On Sunday they were gone and replaced by Snow Geese.


